
I remember the first time I made homemade ice cream vividly. It was a hot summer afternoon, and my Mexican neighbor, Rosa, invited me over to help her churn vanilla ice cream in her old-fashioned hand-crank machine.
She said it was a family recipe passed down from her abuela. As the cream thickened and the scent of vanilla filled the air, I was transported to a simpler time. That experience sparked my obsession with creating ice cream at home.
Table of Contents

The Allure of Homemade Ice Cream
In today’s world of fast food and pre-packaged desserts, the charm of homemade ice cream lies in its simplicity and authenticity.
When you make ice cream yourself, you control every ingredient, from the cream to the sugar, ensuring quality and freshness.
Unlike store-bought brands laden with preservatives and artificial flavors, homemade versions let you create a purer, cleaner treat.
Why Choose Homemade?
There are several compelling reasons to make homemade ice cream:
- Ingredient Control: You decide what goes in — organic milk, less sugar, or dairy alternatives.
- Customization: From lavender-honey to mango-chili, your imagination is the only limit.
- Family Bonding: It becomes an enjoyable activity, especially with children.
- Satisfaction: There is something uniquely rewarding about crafting a dessert from scratch.
Let us explore everything you need to know to master this timeless dessert.
Essential Ingredients and Equipment
The foundation of delicious homemade ice cream lies in using high-quality ingredients and reliable equipment. These components play a pivotal role in determining the texture, flavor, and consistency of your final product.
Key Ingredients for Creamy Homemade Ice Cream
- Heavy Cream: Provides richness and contributes to the creamy texture.
- Whole Milk: Balances the fat content, ensuring the ice cream is not overly heavy.
- Sugar: Sweetens and helps reduce iciness by lowering the freezing point.
- Egg Yolks: In custard-based recipes, yolks add body and smoothness.
- Flavorings: Vanilla extract, cocoa, fruit purees, or nut pastes personalize your recipe.
Optional Add-ins and Flavor Enhancers
From my experience and some inspired advice from La Cucina Italiana, flavor is where you get to express your culinary creativity:
- Vanilla Beans: Offer a deeper, more complex aroma than extract.
- Cocoa Powder: For an intense chocolate flavor.
- Fruit Purees: Strawberries, mangoes, or peaches add vibrant color and natural sweetness.
- Mix-ins: Think cookie crumbles, chocolate chips, or even caramel swirls.
Must-Have Equipment for Ice Cream Making
Though you can make ice cream without any fancy tools, having the right equipment makes the process smoother:
- Ice Cream Maker: Either electric or manual churners work; compressor machines offer top-tier results.
- Mixing Bowls: Stainless steel or glass bowls are ideal.
- Whisk or Electric Mixer: For blending ingredients thoroughly.
- Thermometer: Ensures accurate cooking temperatures for custard bases.
- Airtight Containers: For proper storage and preservation in the freezer.
Having these basics at your disposal sets the stage for a successful ice cream-making session.
Crafting the Perfect Ice Cream Base
The secret to luscious homemade ice cream lies in the base. Mastering this step ensures consistency in texture and flavor every time.
Custard vs. Philadelphia-Style Bases
There are two main types of ice cream bases:
- Custard Base (French Style): Made with egg yolks, cream, and milk. It requires gentle cooking and results in a rich, smooth ice cream.
- Philadelphia-Style Base (American Style): Made without eggs. It is quicker to prepare and tastes lighter.
Custard bases require precision but reward you with unmatched creaminess. Philadelphia-style bases are excellent for quick recipes and highlight the main flavors more clearly.
Step-by-Step Guide to Making a Custard Base


- Whisk Yolks and Sugar: In a bowl, combine egg yolks with sugar until the mixture turns pale.
- Heat Cream and Milk: In a saucepan, heat the dairy until it begins to steam. Do not boil.
- Temper the Yolks: Slowly pour the hot milk into the yolks while whisking. This prevents curdling.
- Cook Until Thickened: Return the mixture to the pot and stir constantly until it thickens enough to coat a spoon (around 170°F).
- Strain and Cool: Pour through a fine mesh sieve to remove any cooked bits.
- Chill: Refrigerate the mixture for at least 4 hours or overnight.
Tips for a Smooth and Creamy Base
According to expert guidance from Saveur:
- Avoid Overheating: Eggs will scramble if the temperature exceeds 180°F.
- Use a Sieve: Always strain the base to remove any coagulated bits.
- Chill Thoroughly: A cold base churns better and forms fewer ice crystals..
This structured process is essential for crafting the finest custard ice cream base that sets a professional standard.
Churning and Freezing Techniques
Once your ice cream base is prepared, the next crucial step is churning and freezing. This phase transforms a simple liquid into a luxurious frozen dessert.
Using an Ice Cream Maker
Ice cream makers are available in three main types:
- Manual Crank: Traditional and nostalgic, offering control but requiring effort.
- Freezer Bowl Machines: Popular and affordable, but the bowl must be pre-frozen.
- Compressor Machines: Professional-grade, with built-in freezers.
Churning incorporates air and prevents large ice crystals from forming. Always follow the manufacturer’s instructions for best results.
Tips from La Cucina Italiana:
- Chill the base before churning.
- Do not overfill the bowl; leave space for expansion.
- Once churned, transfer the ice cream to a cold container immediately.
No-Churn Methods for Homemade Ice Cream
For those without machines, do not worry. No-churn recipes offer excellent alternatives:
- Condensed Milk and Whipped Cream Base: Whip cream to stiff peaks and fold in sweetened condensed milk.
- Freeze with Stirring: Pour base into a shallow dish, freeze, and stir every 30 minutes for 2-3 hours.
This method may yield slightly denser results, but with the right balance, it can rival machine-made versions.
Storing and Serving Homemade Ice Cream
Proper storage maintains flavor and texture:
- Use airtight containers.
- Cover the surface with parchment to prevent ice crystals.
- Store in the back of the freezer where temperature is more stable.
- Let ice cream sit at room temperature for 5 minutes before scooping.
These practices ensure your ice cream remains fresh, scoopable, and delicious.
Flavor Variations and Customizations
Flavor is where homemade ice cream truly shines. Unlike commercial brands, your options are endless and only limited by your creativity and available ingredients.
In my kitchen, this is where the real magic happens. My grandmother used to stir fresh mint leaves into our vanilla base, while I’ve experimented with lavender honey, cayenne chocolate, and even roasted fig and balsamic swirl.
Classic Flavors: Vanilla, Chocolate, and Strawberry
Sometimes, the simplest flavors are the most satisfying. To make vanilla:
- Use a high-quality vanilla bean (split and scraped) or pure vanilla extract.
- Pair it with a rich custard base to let the flavor shine.
For chocolate:
- Mix cocoa powder into your base or melt high-quality dark chocolate into the hot cream.
- Add a pinch of salt to enhance depth.
Strawberry requires:
- Pureeing fresh or macerated strawberries and folding them into the chilled base.
- Optionally, roast them first for concentrated flavor.
Creative Twists: Incorporating Unique Ingredients
Inspiration often strikes unexpectedly. I once tossed leftover spiced pear compote into a vanilla base, and it turned into a hit. Here are other unique ideas:
- Herbs: Basil, rosemary, or thyme infuse well when steeped into warm cream.
- Spices: Cinnamon, cardamom, or star anise add exotic notes.
- Savory Touches: A pinch of sea salt, swirls of olive oil, or even a hint of miso.
Seasonal and Dietary Variations
Depending on the season and dietary needs, you can still enjoy excellent homemade ice cream:
- Dairy-Free: Use full-fat coconut milk or a blend of almond and oat milk.
- Vegan: Rely on coconut cream or cashew milk and thicken with arrowroot or agar.
- Seasonal: Embrace rhubarb in spring, berries in summer, pumpkin spice in fall, and peppermint in winter.
According to Saveur and Munchery, letting seasonal produce lead your flavor profiles not only improves freshness but also aligns your dessert with nature’s rhythms.
Once you begin experimenting, it becomes clear how liberating homemade ice cream truly is.
Homemade Ice Cream Troubleshooting Common Issues
Even experienced home cooks encounter issues when crafting homemade ice cream. The following are some common problems and their solutions.
Preventing Ice Crystals and Icy Texture
One of the most frustrating outcomes is icy ice cream. Causes include:
- Insufficient Fat or Sugar: These help inhibit large ice crystal formation.
- Warm Base: Always chill the base thoroughly before churning.
- Slow Freezing: Speed matters; fast freezing means smaller crystals.
Fixing Over-Churned or Grainy Ice Cream
According to King Arthur Baking:
- Over-churning can lead to buttery or grainy textures.
- Stop the churner when the ice cream looks like soft-serve; over-processing destroys air structure.
- If grainy, rewarm and blend the mixture, then rechill and churn again.
Adjusting Sweetness and Flavor Balance
If your ice cream is overly sweet or bland:
- Taste your base before freezing. It should be slightly sweeter when liquid.
- Add acidity (lemon juice or vinegar) to balance excess sweetness.
- Infuse longer or double your flavorings for more intensity.
These tweaks ensure your ice cream aligns with your palate and expectations.
Homemade Ice Cream FAQs – People Also Ask
How do you make ice cream at home?
Making ice cream at home follows a few basic steps:
Choose a base (custard or eggless).
Mix and heat your ingredients (if using eggs).
Chill the mixture completely.
Churn in a machine or freeze manually.
Store and enjoy after 2-4 hours of firming.
This process gives you full control over quality and taste
How to make 3-ingredient ice cream?
For a simple recipe:
2 cups heavy cream
1 can sweetened condensed milk
1-2 teaspoons vanilla extract
Whip the cream until peaks form, fold in the condensed milk and vanilla, and freeze in a loaf pan. That is it! This no-churn ice cream is ready in a few hours.
How to make ice cream at home without a machine?
No machine? Try this:
Freeze your base in a shallow dish.
Stir it every 30 minutes to break up crystals.
Alternatively, use the whipped cream and condensed milk method mentioned above.
This method works surprisingly well and is perfect for beginners.
What is the best milk to make homemade ice cream with?
The best milk depends on the desired richness:
Whole milk gives balance.
Heavy cream provides luxurious texture.
Coconut milk suits dairy-free versions.
Avoid low-fat options; they result in icier outcomes.
For optimal results, a mix of whole milk and heavy cream is ideal.
Conclusion and Final Tips
In this guide, we have explored everything from ingredients to equipment, flavor development to troubleshooting. With just a few tools and a bit of planning, anyone can create exquisite homemade ice cream.
- Use fresh, quality ingredients.
- Master the base.
- Be patient during chilling and churning.
- Store correctly to maintain texture.
Above all, enjoy the process. The joy of tasting your first spoonful, knowing it came from your hands, is unmatched. Now, grab that scoop and begin your delicious journey.

Nutrition Facts for 1 Cup of Homemade Ice Cream
- Serving Size: 1 cup
- Calories: 560 Kcal
- Sugar: 44g
- Sodium: 130mg
- Fat: 40g
- Saturated Fat: 24g
- Unsaturated Fat: 14g
- Trans Fat: 0.6g
- Carbohydrates: 48g
- Fiber: 0g
- Protein: 8g
- Cholesterol: 140mg
Disclaimer: This article is for informational purposes only. It does not constitute medical or nutritional advice, diagnosis, or treatment. Always consult a professional for health-related decisions.
Print
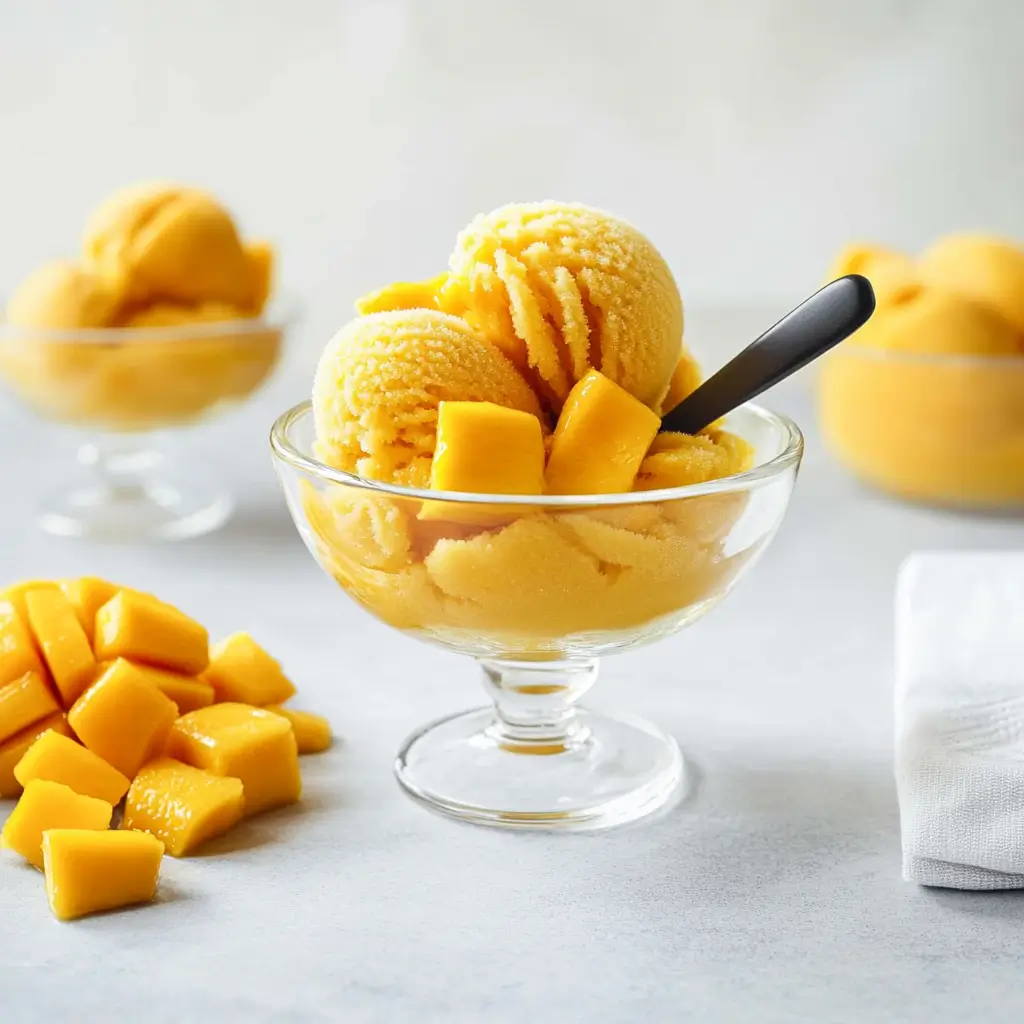
Homemade ice cream quick and easy
- Total Time: 15 minutes (plus chill and freeze time)
- Yield: Serves 4
- Diet: Vegetarian
Description
This quick and easy homemade ice cream recipe delivers rich, creamy results with minimal effort. Using just a few ingredients, you’ll create a frozen treat that’s free of preservatives, completely customizable, and bursting with real flavor — the perfect dessert for any occasion.
Ingredients
1½ cups heavy cream
1½ cups whole milk
⅔ cup cane sugar
2 teaspoons vanilla extract
⅛ teaspoon sea salt
Instructions
In a medium saucepan, combine heavy cream, whole milk, sugar, vanilla extract, and sea salt over medium-low heat until the sugar dissolves and the mixture is warm
Pour the mixture into a heatproof bowl, cover, and chill in the refrigerator for at least 2 hours or overnight
After chilling, whisk the base and pour it into your ice cream maker, then churn according to the manufacturer’s instructions (typically 20–30 minutes)
Transfer the churned homemade ice cream to an airtight container and freeze for 2 to 4 hours for a firmer texture
Before serving, allow the ice cream to sit at room temperature for a few minutes to soften
Enjoy your easy homemade frozen dessert with toppings of your choice
Notes
For a dairy-free option, substitute full-fat coconut milk for the cream and milk
You can add chocolate chips, fruit purees, or cookie crumbles during the last few minutes of churning
Using vanilla bean paste instead of extract can elevate the flavor and visual appeal of your homemade ice cream
Always chill your base completely for best churning results and creamy texture
- Prep Time: 10 minutes
- Cook Time: 5 minutes
- Category: Dessert
- Method: Churned
- Cuisine: American
Nutrition
- Serving Size: ½ cup
- Calories: 280 Kcal
- Sugar: 22g
- Sodium: 65mg
- Fat: 20g
- Saturated Fat: 12g
- Unsaturated Fat: 7g
- Trans Fat: 0.3g
- Carbohydrates: 24g
- Fiber: 0g
- Protein: 4g
- Cholesterol: 70mg
Keywords: homemade ice cream, easy ice cream recipe, quick ice cream recipe, homemade frozen dessert, no-churn ice cream, vanilla ice cream homemade, summer desserts